Good Afternoon,,,,,,
I get a ton of compliments on my bows, and a ton of people saying they have "bow envy". Why, I do not know, bows are SIMPLE!
So, today, I am giving out my bow making "secrets", although, really, it's no secret :) Bows are very easy on a peg bow system.
I am not the inventor of the peg bow system,,,,,,,,,,and there are plenty of them on the market. Not everyone does theirs exactly the way I do, either,,,,,,,,,whatever works for you. I'm simply going to show you what works for me.
Today, we'll make two bows,,,,,,,,,what I consider my "basic" bow and a simple "butterfly bow.
This post is my basic bow tutorial, and I recommend getting this one down pat before attempting anything more complicated.
So, you'll need a peg bow maker. This is really easy to make. You don't need anything fancy or expensive, although they do sell for anywhere from 10.00 to 40.00.
Although you CAN buy them, they are simple to make,,,,,,,,
you'll need a piece of wood for the base,,,,,,,two dowels,,,,,,,,and holes drilled across the base. I recommend about every inch for up to six inches,,,,,,,,,you probably won't need larger than six inches for any card or scrap book page,,,,,,,
but if you make wreaths or whatever, you CAN make a longer bow maker and make bows as large as you wish.
I also recommend the LAST hole be 1/2 inch from the one before it,,,,,,,,this way, you can make any size bow from 1-6.5 inches and everything, whole and half inches in between. You change the size of the bow by simply moving the dowels closer or farther apart.
If you're like me, and you don't care if your bows are EXACTLY 3 inches, and you eyeball everything,,,,,,
I bought this at Michael's Craft Store,,,,,,,,,I have no idea what it's original intention was,,,,,,,but it was with the wooden letters,,,,,,,,,,,,it has TWO rows of holes, which is NOT necessary,,,,,,,,,,this is just the way it came, and I use only one row of holes. So if you're making one, one row of holes is all you need to drill. However for 59 cents (and it came with several dowels),,,,,,,I couldn't go wrong, So if your husband isn't thrilled about making you one, and you don't want to spend your month's scrappy allowance on a bow maker,,,,,,,,,run to Michaels and see if you can't snag this baby for next to nothing.
On to bow making!
for ease of understanding, directions are UNDER the pictures,,,,,,,
you'll need a bow maker
a length of ribbon (about a foot for this bow)
scissors
you.
place the length of ribbon across the dowels. I have them set at about 4 inches apart here, and am using 1.5 inch ribbon for this bow (my favorite size). The ends of the ribbon should be in the back,,,,,,,and you should be sitting at the front. This is the front of the bow, where you can control how the bow will look.
cross the right tail over the left tail (you can do this with two hands,,,,,I was trying to one hand it because I was taking photos with the other LOL). Now you have a top tail and a bottom tail.
Pull the top tail down and the bottom tail up so they are "twisted" in the back.
Now the top tail goes down over the TOP of the bow. I like to fold it i n half at this point, so my bow center bridge is nice and neat. Tuck that underneath the bow so that it is under the other tail now. You can see your bow forming now!
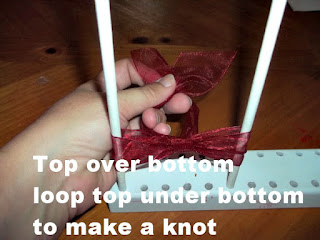
Now that you have both tails happy together again in the back of the bow, cross the top over the bottom. See that loop there? I've stuck my fingers in there to show you the loop. tuck the top one under the loop and bring it up through the loop to make a knot.
Grasping each of the tails now, PULL TIGHT (but not toooooooooo tight!)
you now have a bow on the bow maker. Slide the bow off the top, or if you'd rather, pull the dowels out.
You can also cut the ends here, or wait til it is off the bow maker, whichever you like.
Finished,,,,,,,,Easy peasy. It takes a few tries, but it is WELL WORTH it! You can tighten the bow by pulling on the tails, and shape it a bit by pulling on the ears. This bow works well for satin ribbon too!
I hope you enjoyed this tutorial,,,,,,,,,,,,really, they are TOO EASY!
Next up,,,,,,,,,a butterfly bow!


Great tutorial! I have the Ultimate Companion and never think to use the bow maker part until after the fact LOL! TFS
ReplyDeletePINNED! I TOTALLY love this--and I am so glad you shared how to make your gorgeous bows, Holly!!! :)
ReplyDeleteThis is a wonderful tutorial- was able to make my first bow last night. Thanks so much!
ReplyDeleteJust wanted to let you know also that I referenced these tutorials and linked your blog in my most recent post =]