


I don't know about you, but if you're anything like me,,,,you give a ton of gift cards at the holidays. Frankly, my kids and grands (especially the boys) love video games,,,,but I never buy them because unless they tell me specifically which ones they want, I'm at a loss,,,,,,,not to mention they have so many game systems, I never know WHICH game system to buy for! And the girls? who KNOWS what style shirt they want??? So I give either American Express gift cards,,,,or Game Stop gift cards,,,or one of a million clothing store gift cards coming out the wahoo.
So I'm ALWAYS looking for new, creative, EASY ways to present them that's a bit more personal than just a gift card. And I tell you what,,this one's a keeper!
I totally STOLE this idea from my friend Melissa. You can find her gorgeous creations HERE! She used this tutorial over at Two Peas here!
And they're ADORABLEEEEE. But I quickly found out that although they're EASY,,they are time consuming. Unless you can get an SVG file and your cutter will cut it, you're pretty much cutting them by HAND because of the curves on them. If I'm making one or two,,,,no problem,,,,,,,,but I need DOZENS of gift card holders for the holidays,,,,,,,
so I put on my thinking cap,,,,and I adjusted this little recipe to my own needs.
I just made square cards,,,,,,,
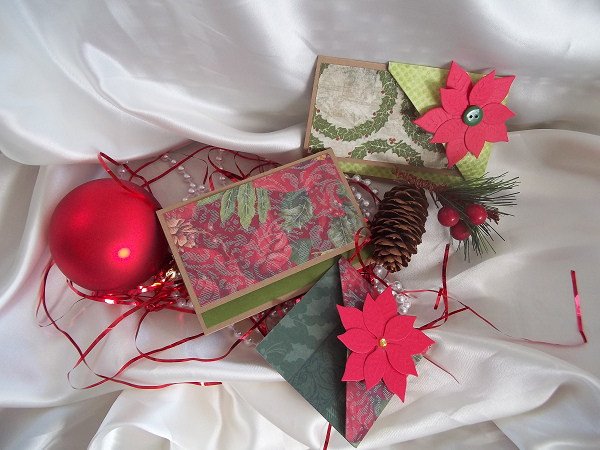
I used my trimmer to cut a piece of 8.5x11 kraft cs down to a 7 and 1/4 by 41/2 rectangle for my base (this is the same size the cards in the Two Peas tutorial are,,,,i just didn't bother with the curves on the flaps.) I got two out of each piece of paper. Then I cut 2 flaps, 1 at at 2 1/2 X 4 1/4 and the second at 1 1/2 X 4 1/4 out of patterned paper. Again with my trimmer, and simple rectangles.
I scored the Kraft base at 2 1/2 and 5 1/2 (the same place the two peas tut scores), folded on the score lines, ommitted the brads (I HATE brads!), and secured the smaller flap with ATG on the sides only. I glued the smaller patterned paper pieces to the flaps, and I was done,,,,,,,
almost.
I sat looking at the gift card holders thinking that a corner book mark would sit nicely on that corner,,,,,and so I made some! Really, there are tutorials all over split coast stampers and youtube for these, they are ridiculously easy to make.
And so I made some corner book marks and sat them on the corners of the gift card holder,,,,it serves to hold them closed as well, so no closure needed! A nice poinsettia,,,,,or a diecut or a bow on the bookmark, and it's decorated too! The recipient can remove the book mark, then open the gift card,,,,and they will have a decorated book mark to keep as well as the gift card. Easy Peasy, I tell you,,,,,
So in my pics today, you'll see 3 photos,,,,,one is the gift cards I totally CASE'd from Melissa,,,,,one is the square ones I adjusted from her recipe to make them faster and easier to make,,,,,and the other shows the book mark removed so you can see it.
Quick, fast, easy and fun!!!!! Hope you enjoyed, and thanks to Melissa for the awesome ideas!!!!!
Oh,,,,,and for the record,,,,,,my daughter told me all the JUNK in my photos made it look more like Mardi Gras than Christmas,,,,,,,
hmmmmmmmmmm she may be right LOL.
Wow, Holly, these are GORGEOUS! What a clever idea to use the corner bookmark - I'm totally stealing that one!!
ReplyDeleteI stole yours,,,,go ahead and steal mine!
ReplyDelete